Vue development framework is very helpful in building a wide range of applications across multiple industries. However, as the codebase and user base of the app grows, it becomes more vulnerable to security attacks and data leaks. Therefore, security is a top priority for a VueJS development company while developing Vue apps. Hence, they use platforms like Auth0 to implement security measures such as authentication. It helps ensure that unauthenticated users can not access the applications along with their sensitive or private content. This blog on auth0 Vue authentication focuses on connecting the auth0 platform with your Vue application, implementing login and logout functionalities, and adding a route guard. Let this blog serve as your step-by-step guide to Vue app authentication using auth0.
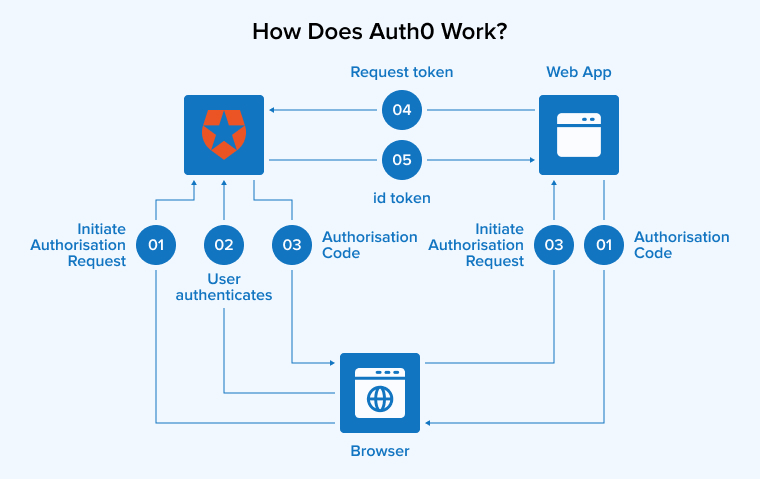
1. How Does Auth0 Work?

Securing your web app stack becomes easy with Auth0. It is not necessary to have expertise in identity protocols when you are working with Auth0. All you have to do is iterate your app with Auth0 and then redirect your users to a customizable login page from Auth0 for login.
Once users log in successfully, Auth0 uses JWTs or JSON Web Tokens to redirect the users back to your existing application along with their user information and implement user authentication.
2. Get the Vue.js Starter Application
Use create-vue to build a starter project. You can learn security concepts in VueJS by practicing them. To protect your app, you need to create it using VueJS components along with the Composition services and APIs.
You can initiate the process by cloning the spa_vue_javascript_hello-world_composition-api repository on its starter branch:
git clone -b starter git@github.com:auth0-developer-hub/spa_vue_javascript_hello-world_composition-api.git |
After cloning the repo, make spa_vue_javascript_hello-world_composition-api your current directory:
cd spa_vue_javascript_hello-world_composition-api |
Now, use the following command to install the VueJS project dependencies.
npm install |
You will get a functional app from the starter VueJS Composition API project. It hydrates the user interface by obtaining the data from the external API. The starter project uses the JSON-server to simulate the external API locally for convenience and simplicity. Then, choose a backend technology that you can use to integrate the real API server with the VueJS Composition API.
By default, the compatible API server runs on http://localhost:6060. So, you have to create a .env file in your root directory project to integrate the Vue.JS Composition API app with the API server.
touch .env |
Now, populate the .env file with the environment variables mentioned below:
.env VITE_API_SERVER_URL=http://localhost:6060 |
Now, you must use the Vite front-end tool to set up the VueJS build officially. If your environment variables have a ‘VITE_’ prefix then Vite will expose them to the Vite=processed code. It prevents accidental leaks of environment variables from your system to your client’s app. Now, to run the JSON server API, you have to execute the command given below:
npm run api |
Open a new terminal tab and run your VueJS Composition API app by implementing the following command:
npm run dev |
Everything is in place and you can execute user authentication in your VueJS Composition API project.
Before proceeding, you need to connect the VueJS Application with Auth0 by configuring it. Afterward, secure the routes with the help of Auth0 Vue SDK. This SDK also enables you to display the user profile information and request protected data from an external API server which hydrates a few app pages.
3. Connect Vue.js with Auth0
The following steps discuss the streamlined and simplified process to connect VueJS with Auth0:
3.1 Sign Up and Create an Auth0 Application
Creating a free account provides you with the following:
- Auth0 Universal Login for Web, Android, and iOS
- Unlimited Serverless Rules to extend or Customize the capabilities of Auth0
- Allows you to use two social identity providers such as GitHub, Google, and more
- Unlimited logins and 7000 free active users.
When you sign up, Auth0 creates a Tenant. It represents the server or product where you would add authentication. Once you sign into Auth0, the dashboard appears.
Click on the Applications button on the left sidebar menu. Inside that, click on the Create Application button. It would open a modal with a form where you have to insert the name of the app and select its type. For example:
- Name: Auth0 Vue.js Sample
- Application Type: Single Page Web Applications
After that, click the Create button. It will load an Auth0 app page.
Read More: How to Build VueJS Single Page App?
3.2 Create a Communication Bridge Between Vue.js and Auth0
There is no need to create login forms once you start using Auth0 because it provides a Universal Login page that reduces the overhead of adding and managing the authentication.
So, how does this Universal Login work?
When the authentication requests trigger, your VueJS app will redirect users to Auth0’s login page. After successfully logging into Auth0, Auth0 redirects users back to the VueJS app.
To ensure end-to-end protection for this redirection, you must specify the URLs in the Auth0 app settings where you want to redirect users after they complete authentication.
Go to the settings in your Auth0 app page and fill in the following details:
- Allowed Callback URLs: This URL is where you want your users to be redirected after a successful login.
- Allowed Logout URLs: This URL is where you want your users to be redirected once they log out successfully.
- Allowed Web Origins; Add the origin URL for your VueJS app to avoid CORS issues. Your Auth0 VueJS app would request the Auth0 URL to manage the authentication requests using Auth0 SPA SDK.
Once you insert all the necessary information, scroll down and click the Save Changes button. You will require some of this information further down the road so don’t close the page.
3.3 Add the Auth0 Configuration Variables to Vue.js
To use the communication bridge, you need to retrieve the Client ID and Auth0 Domain values from the Auth0 app setting page.
First, open the Vue starter project and auth0-vue-sample. Now, go to the project directory and create an auth0Config.json file.
touch auth0Config.json |
Then populate auth0Config.json with the commands shown below:

Go back to the Auth0 app page to retrieve the required values by following the steps given below:
- Click on the Settings.
- Use the “Domain” value from the “Settings” as the value of the domain in auth0Config.json.
- Use the “Client ID” value from the “Settings” as the value of clientId in auth0Config.json.
Once you get the values, leave them as empty strings. With these values, your Vue application will be recognized as an authorized party and will be allowed to interact with the Auth0 authentication server.
3.4 Auth0 and Vue.js Connection Set
Once the Authentication service for your VueJS app is all set, it’s time to build a starter project.
4. Install Auth0 SDK
Add the Auth0 Client SDK to your VueJS app using the following command:
npm install @auth0/auth0-spa-js |
4.1 Create an Authentication Wrapper
You have to start the Auth0 SDK using the lifecycle hooks from Vue before initiating your VueJS application. Using the beforeCreate hook in the App.vue file might not be the right choice.
The very first Vue lifecycle hook to fire up is the beforeCreate hook but it does so only after a new Vue() creates the Vue application. But remember that Auth0 SDK should be initialized before the Vue app with the help of the Vue plugin.
Leverage the Vue.use() command to use the Vue plugin. Execute this command before starting your application. This process is to build an Authentication Wrapper which happens to be a Vue plugin.
Create a new directory named auth in the src directory. Create a new file named index.js in the auth directory. Now, copy the code given below and paste it into the index.js file.
import Vue from "vue"; import createAuth0Client from "@auth0/auth0-spa-js"; /** Establish a standard procedure to execute following verification of identity. */ const STANDARD_REDIRECT_CALLBACK = () => window.history.replaceState( {}, document.title, window.location.pathname ); let auth0Instance; /** Provides the current instance of the software development kit (SDK). */ export const getAuth0Instance = () => auth0Instance; /** Generates an instance of the Auth0 SDK. If an instance already exists, it returns the existing one. */ export const initializeAuth0 = ({ onRedirectCallback = STANDARD_REDIRECT_CALLBACK, redirectUri = window.location.origin, ...options }) => { if (auth0Instance) return auth0Instance; // The 'auth0Instance' is just a basic Vue object. auth0Instance = new Vue({ data() { return { authenticatorClient: null, error: null, isAuthenticated: false, isLoading: true, isPopupVisible: false, userObj: {}, }; }, methods: { /** Verifies the user through a popup window. */ async handleLoginWithPopup(options, config) { this.isPopupVisible = true; try { await this.authenticatorClient.loginWithPopup(options, config); } catch (err) { console.error(err); } finally { this.isPopupVisible = false; } this.userObj = await this.authenticatorClient.getUser(); this.isAuthenticated = true; }, /** Processes the callback during login through a redirect. */ async handleRedirectCallback() { this.isLoading = true; try { await this.authenticatorClient.handleRedirectCallback(); this.userObj = await this.authenticatorClient.getUser(); this.isAuthenticated = true; } catch (err) { this.error = err; } finally { this.isLoading = false; } }, /** Verifies the user via the redirect method */ loginWithRedirect(obj) { return this.authenticatorClient.loginWithRedirect(obj); }, /** Retrieves all claims contained in the ID token */ getIdTokenClaims(obj) { return this.authenticatorClient.getIdTokenClaims(obj); }, /** Provides the access token. If the token is missing or invalid, a new one is obtained. */ getTokenSilently(obj) { return this.authenticatorClient.getTokenSilently(obj); }, /** Retrieves the access token via a popup window */ getTokenWithPopup(obj) { return this.authenticatorClient.getTokenWithPopup(obj); }, /** Logs the user out and deletes their session on the authorization server. */ logout(obj) { return this.authenticatorClient.logout(obj); } }, /** Utilize this lifecycle method to create an instance of the SDK client. */ async created() { // Generate a fresh SDK client instance utilizing properties from the supplied options object this.authenticatorClient = await createAuth0Client({ ...options, client_id: options.clientId, redirect_uri: redirectUri }); try { // In the event that the user revisits the application subsequent to authentication. if ( window.location.search.includes("code=") && window.location.search.includes("state=") ) { // Manage the redirection process and obtain tokens const { appState } = await this.authenticatorClient.handleRedirectCallback(); // Inform subscribers that the redirection callback has occurred, providing the appState as well // (Beneficial for fetching any state before authentication.) onRedirectCallback(appState); } } catch (e) { this.error = e; } finally { // Set up our internal authentication status this.isAuthenticated = await this.authenticatorClient.isAuthenticated(); this.userObj = await this.authenticatorClient.getUser(); this.isLoading = false; } } }); return instance; }; // Develop a basic Vue plugin to make the wrapper object accessible across the entire application export const AuthenticationPlugin = { install(Vue, options) { Vue.prototype.$auth = initializeAuth0(options); } }; |
4.2 Create Config File
Values are provided for the ClientID and Domain which we discussed earlier by passing the option object to the plugin. Now go to your app’s root directory and create a new file called auth0Config.json. The values for Domain and ClientID are extracted from the app. Now, run the following code in your newly created auth0Config.json file and then update it with the values for your app.
{ "domain": "yourDomain", "clientId": "yourClientId" } |
The non-sensitive values of your Auth0 app are stored in this configuration file, so you don’t need to commit this file to the source control. Just add your file name to the .gitignore file to ensure that.
4.3 Add Plugin To Our Vue Application
We need to ask Vue to use the plugin once we have built it. But first, you need to add two import statements as given below to the main.js file. It helps import the plugin along with the Client ID and Domain values from the auth0Config.json file.
// Importing Auth0 config import { domain, clientId } from "../auth0Config.json"; // Importing authentication plugin import { AuthenticationPlugin } from "./auth"; |
Now, it’s about time we tell Vue to use the plugin. So, after adding the two import statements to the file, add the code given below:
// Installingauthentication plugin Vue.use(AuthenticationPlugin, { domain, clientId, onRedirectCallback: appState => { router.push( appState && appState.targetUrl ? appState.targetUrl : window.location.pathname ); } }); |
4.4 Login to the App
Two login methods, namely loginWithRedirect and loginWithPopup, are available using the plugin code in your auth/index.js file. Users can register or log in to your app through the hosted login page from Auth0.
When users utilize the handleLoginWithRedirect method to log in, clicking on the Login button will redirect them to Auth0’s login page. They have to enter their login details there. After a successful login, the Auth0 will redirect them back to the app.
If you choose not to redirect then you have another option of Popup. This method, allows the users to log in or register for your app through a popup on the website. The code below shows both login methods.
There will be two entries for the Home and About pages in the nav when you open the App.vue files. Add two buttons of Login and then add the following code in the nav:
Home | About | | Login | Login Popup | |
To ensure the $auth.loading is false, buttons need to be wrapped in a directive. Upon reviewing the plugin’s code, you can see there is an isAuthenticated value in a data section. When the user successfully authenticates with Auth0, the system sets this value, eliminating the need to show two login buttons.
The buttons are shown below the links for the Home and About buttons after we add the div. If you want them all in the same line then you need to update your CSS styles as below:
#navigation { justify-content: center; display: flex; padding: 20px; } #navigation a { color: #2d4051; font-weight: bold; padding: 0 5px; } |

Now, your app will show all the buttons in the same line including the login and loginPopup. Add methods object with both methods to implement them. Use the following code:
methods: { loginWithRedirect() { this.$auth.loginWithRedirect(); }, loginWithPopup() { this.$auth.loginWithPopup(); }, } |
The $auth acts as a handle for your plugin which consists of the methods. It’s time to call them. Open your app and click on the login button to go directly to the hosted login page of Auth0.

Clicking on the Login Popup button will open a login modal in your app as shown below:

You will have the option to sign up or log in to the application regardless of the method you select. When you return to the app after creating the account, you can see that the login buttons are now hidden because the isAuthenticated value is set to true in the plugin.
4.5 Implement Logout
After getting over with login, it’s time to implement logout. You can add the logout button with this
4.6 Logout
As per the directive, the system only shows this button to the authenticated user. So, you can see the Logout button when you return to the app.

Now, execute the following code to implement Logout:
logout() { this.$auth.logout(); this.$router.push({ path: '/' }); } |
The logout function is called in the plugin. If the users are on the page that isn’t visible to the authenticated users then they are redirected to the homepage.
5. How to Only Show Pages to Authenticated Users
Since we have created our app recently, it will only have two pages; the Home page and the Dashboard page. So, let’s say that the Dashboard Page is only visible to the authenticated users logged into the application. The nav will only show the Dashboard page to the logged-in users.
This same directive is used to display the Logout button. Update your nav with the following code:
<router-link v-if="$auth.isAuthenticated" to="/dashboard"> Dashboard </router-link> |
6. How to Add a Route Guard
Earlier we added a hidden link in the About page in the nav so that it cannot be seen by the users who aren’t authenticated. But if the user types in the URL/about then they can directly visit the About page of your website or application.
So, in a way, the unauthenticated users can still access your page meant only for the authenticated users. You can use the route guard to avoid this and completely secure your app page. Create a new file named authGuard.js in your auth directory and then add the following code to this new file:
import { getAuth0Instance } from "./index"; export const authenticationGuard = (to, from, next) => { const authenticationService = getAuth0Instance(); const fn = () => { // If the user is verified, proceed with the route if (authenticationService.isAuthenticated) { return next(); } // Alternatively, proceed with the login process authenticationService.loginWithRedirect({ appState: { targetUrl: to.fullPath } }); }; // If the loading process is complete, examine our authentication state utilizing fn() if (!authenticationService.loading) { return fn(); } // Monitor the alteration of the loading property prior to verifying isAuthenticated authenticationService.$watch("isLoading", isLoading => { if (!isLoading) { return fn(); } }); }; |
This code checks if users are authenticated. It redirects the users to the hosted login page when they try to access a secure page. If users fail to login or are not authenticated then the code will redirect them away from the page they are trying to access. The page is protected in this manner only because we have implemented the route guard in the Vue router.
Go to the router directory and open the index.js file to import the authGuard with this:
import { authGuard } from "./auth/authGuard"; |
Now, add the route guard to the page. In this case, it’s the About page. So, you have to update it like this:
{ path: '/dashboard', name: 'Dashboard', component: () => import(/* webpackChunkName: "dashboard" */ '../views/Dashboard.vue'), beforeEnter: authenticationGuard } |
Now go to your app, if you are an authenticated user then you can see the About entry in your nav. Then log out of the app and manually try to access the about page. You can see that you are redirected to the Auth0-hosted login page.
If everything happens as discussed, adding the Auth0 authentication to your Vue app has been successful.
7. Conclusion
Auth0 is an authentication of a service product. We add it to the apps to secure your application with easy-to-use authentication functionality.
This article showed you how auth0 works, how you can integrate it with the VueJS application, and how to install the auth0 SDK. This guide also covered the basic authentication use cases of login and logout that prevent unauthenticated users from accessing the sensitive pages or information on your application.
Thanks for reading, if you have any further queries or want to discuss the complex use cases of auth0, don’t hesitate to connect with our experts.


Comments
Leave a message...