When it comes to single-page applications, routing is known as the hub that enables the Angular development companies to get the right components loaded for the application state or current view. In such cases, when applications are loaded or operations are triggered by the users, routes are often requested and the request also can be raised based on inputs from the server. In this blog, we will understand how in Angular, the router has various essential building blocks and we will learn more about Angular Routing.
1. What is Angular Routing?
Angular Routing is a very essential concept since its initial use in creating Single Page Applications (SPAs). This type of application is once loaded and then new content is dynamically added. Some of the best examples of Single Page Applications are Twitter, Facebook, and Google. The major advantage of such Angular applications is that they offer an excellent user experience. Besides, SPAs are the type of applications in which one doesn’t have to wait for the page to load and this is why they are faster than other applications and offer a desktop-like feel. This proves that the routing module of Angular offers the best services to the applications and it generally specifies the app’s navigation route with a forward slash (/) which is then followed by the corresponding path name that defines the new content.
After understanding routing and how vital it is in Angular, let us learn about working with the same.
2. Building Your Angular Navigation Menu Using Routing Module
Here are the steps that will help Angular developers to create an Angular navigation menu using the routing module.
2.1 Implementing the Top Menu
The very first step is to implement the top menu which is always visible in the application no matter where the user navigates himself. And to have that in your client’s web application itself, you need to add the top menu at the root component level of the application. To do so, follow the below-given code.
<router-outlet> <nav class="navbar navbar-fixed-top-menu navbar-dark bg-inverse"> <div class="container"> <a class="navbar-brand">Angular Router</a> <ul class="nav navbar-nav" routerlinkactive="active"> <li class="nav-menu-item"><a class="nav-menu-link" routerlink="home">Home</a></li> <li class="nav-menu-item"><a class="nav-menu-link" routerlink="aboutus">About Us</a></li> <li class="nav-menu-item"><a class="nav-menu-link" routerlink="programs">Programs</a></li> <li class="nav-menu-item"><a class="nav-link" routerlink="contactus">Contact Us</a></li> </ul> </div> </nav> </router-outlet> |
When the client’s business is huge and the site’s top menu needs to be bigger than usual, then the best alternative is to put the menu in a separate top-menu.component.ts. In this case, the developers need to notice the routerLink directives, link it to the home, programs, and about us.
Besides this, checking the router-outlet directive is also necessary and this directive means that the main content of the webpage below the top menu is placed precisely. Also, the developers need to notice that there is no side navigation bar as the side navigation is something that should be visible only when the users click on Programs. And for this, route configuration is required, so let’s have a look at it in the next stage.
2.2 Router Configuration – Top Menu Navigation
Here is the code that helps in the initial configuration and it covers all the top menu navigation options:
export const routerConfig: Routes = [ { path: 'home', component: HomeComponent }, { path: 'aboutus', component: AboutUsComponent }, { path: 'contactus', component: ContactUsComponent }, { path: 'programs', component: ProgramsComponent, children: [ { path: '', component: ProgramsCardsComponent }, { path: ':id', component: ProgramsCategoryComponent }, { path: '', outlet: 'sidemenu', component: SideMenuComponent }, { path: ':id', outlet: 'sidemenu', component: SideMenuComponent } ] }, { path: '', redirectTo: '/home', pathMatch: 'full' }, { path: '**', redirectTo: '/home', pathMatch: 'full' } ]; |
As seen in the above code, the home, program URL paths, and about us sections are currently mapped on only one component. But here, one thing that needs to be checked is that few of the redirects are configured for the empty path case or not. And developers need to notice whether the fallback route using the ** wildcard. Once this is done, it is known as a good start as the developers have already defined the home page, a couple of items for common navigation, and have also handled invalid URLs.
So basically, after setting up the top menu as discussed, the developers now have to implement the following things:
- They will have to display a list of program category cards on the page’s main body.
- Besides, they will have to show a side navigation that contains the list of program categories to the users. But this side navigation will be displayed only when the user clicks on Programs.
2.3 Implementing the Side Navigation Menu
Now, to create the side navigation menu, the ProgramsComponent will have to contain a few router outlets itself and the developers will have to include the things described below-
- A primary outlet is required inside the ProgramsComponent that holds a list of program categories.
- In addition to this, an auxiliary router outlet needs to be inside the component of the programs.
In order to implement this scenario, the first thing to do is go over Child Routes.
2.4 The Programs Categories Page
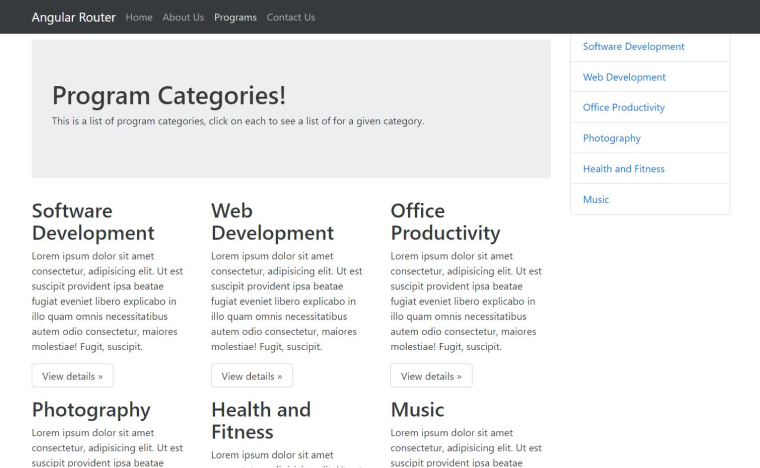
Ideal ProgramsComponent looks like the screenshot given below:

In the above-displayed screen, there are a few main elements that need to be noticed and they are-
- On the screen, there is a main ‘jumbotron’ which shows the headline named Program Categories!.
- There is a side menu that holds each program category’s navigation link.
- Another thing that is seen on the screen is that there is a list of program category cards below the headline section and it holds 3 cards per line.
Basically, the main content page of any business website has a top menu and everything that is applied below it is in place of the router outlet. But the above-specified Programs page will also contain various other internal routing scenarios.
2.5 Implementing the Program Category Cards with a Nested Child Route
Now let’s go through the ProgramsComponent template to understand its implementation process:
<main> <div class="container"> <div class="row row-offcanvas row-offcanvas-right"> <div class="col-xs-12 col-sm-9"> <ol class="breadcrumb"> <li class="breadcrumb-menu-item"><a routerlink="/home">Home</a></li> <li class="breadcrumb-menu-item active">Programs</li> </ol> <div class="jumbotron"> <h1>Program Categories!</h1> <p>This is a list of program categories, click on each to see a list of programs for a given category.</p> </div> <router-outlet></router-outlet> </div> <router-outlet name="sidemenu"></router-outlet> </div> </div> </main> |
In the above-listed code, there are a few router-outlet elements that are placed inside the component of the program that is injected in place of a router outlet. This is known as a “nested” route scenario. Now, it’s time to configure the router that will hold the program category cards component at the unnamed router outlet place. So, let’s have a look at it in the next step.
2.6 Configuring the Nested Route Scenario
To display the program’s categories inside the programs’ Angular components and the components themselves, here is the code that needs to be followed for router configuration:
{ path: 'programs', component: ProgramsComponent, children: [ { path: '', component: ProgramCardsComponent } ] } |
This configuration means that when a user clicks on the programURL, the following things occur:
- The ProgramsComponent is displayed in the main router outlet of the Angular application and it is below the top menu.
- And here, ProgramCardsComponent is displayed in place of the <router-outlet></router-outlet> element of ProgramsComponent.
But in this case, when it comes to displaying the side menu, auxiliary route parameters must be applied which we will see in the next step.
2.7 Auxiliary Routes
The auxiliary route is a concept that describes a scenario where the businesses get various portions of the screen and the content present on those screens is dependent on the value of the URL. This means that when it’s time to configure the router, it corresponds to a route parameter with a non-default outlet name. And here the primary route is completely associated with an outlet that is without a name attribute (<router-outlet></router-outlet>). After this, there can be many other outlets at the routing level as long as the developer gives them different outlet names.
2.8 Implementing the Side Menu Component
The next thing to do is implement the side menu component and this will enable the side menu to be displayed in the router outlet of the side menu. For this, generally, all the websites would want to have the side menu’s content linked dynamically and be dependent on the site’s URL. For instance, when the user is first time checking the Programs section of the website, he would prefer to use the site if the section contains a list of Program Categories (as shown in the above screenshot). But when the user wants to navigate inside a program category, displaying a list of program sub-categories is the best thing to do for the site to be user-friendly.
In order to do this, the SideMenuComponent must have knowledge about the current URL of the site and its pages to load the URL. One can follow the below-given code to offer that.
@Component({ selector: 'app-categories-menu', templateUrl: './categories-menu.component.html', styleUrls: ['./categories-menu.component.css'] }) export class SideMenuComponent { constructor(route: ActivatedRoute) { route.params.subscribe(params => console.log("side menu id parameter",params['id'])); } } |
When the above code is run, one can see that this is just a skeleton implementation of the side menu. In order to get data, a service needs to be injected or the data can be loaded before you create routes and components using a Router Resolver. The code here enables the side menu component property to get the notification whenever there is a change in the URL and this is very important to make the side menu adjustable to the URL content.
2.9 Configuring the Side Menu via a Nested Auxiliary Route
Now, it’s time to place the side menu in the correct position on the site by following the below-given router configuration code.
{ path: 'programs', component: ProgramsComponent, children: [ { path: '', component: ProgramCardsComponent }, { path: '', outlet: 'sidemenu', component: SideMenuComponent } ] } |
This will do the following things when a user navigates to the programs –
- It will display the new SideMenuComponent inside the router outlet which is known as sidemenu.
- There will be a ProgramCardsComponent inside the primary router outlet element.
2.10 Implementing the Program Categories Component
When you are in the programs, the following things must occur –
- Here the content of the router-outlet element inside the Programs must be replaced by a new component that consists of lists of program category content. And this can be the best example for sub-categories on the website’s main page.
- At the same time, the developers will have to click on Software Development for the side menu in order to change its content and display links specific to the Software Development program category.
The above scenario will offer two different sections of the page that give a response to the client’s request separately to the browser URL change which means that the side menu and the main body part of the Programs page can react differently.
2.11 Configuring a New Level of Nesting Inside the Programs Page
When the user of the site clicks on Software Development, the action will cause the URL to change the program – Software Development, and if the website user clicks on Web Development, the action performed by the user will change the URL – Web Development. In order to enable the site to perform similarly, the developer will have to add a new ProgramsCategoryComponent component as this will enable the program components to be displayed in the main body. For this, you can follow the below-given code.
{ path: 'programs', component: ProgramsComponent, children: [ { path: '', component: ProgramCardsComponent }, { path: ':id', component: ProgramsCategoryComponent }, { path: '', outlet: 'sidemenu', component: SideMenuComponent } ] } |
As seen in the above code, a path variable named :id is used to capture the URL part. This variable will hold content for any given example either software-development or web-development.
2.12 Navigating into a Program Sub-Section
If the developer wants to display the development section clearly to the users, the Software Development card is required to do something as described below code:
<div class="row"> <div class="col-xs-6 col-lg-4"> <h2>Software Development</h2> <p>Lorem ipsum dolor sit amet consectetur, adipisicing elit. Ut est suscipit provident ipsa beatae fugiat eveniet libero explicabo in illo quam omnis necessitatibus autem odio consectetur, maiores molestiae! Fugit, suscipit.</p> <p><a class="btn btn-secondary" (click)="navigate('development')" role="button">View details »</a></p> </div><!--/span--> <div class="col-xs-6 col-lg-4"> <h2>Web Development</h2> <p>Lorem ipsum dolor sit amet consectetur, adipisicing elit. Ut est suscipit provident ipsa beatae fugiat eveniet libero explicabo in illo quam omnis necessitatibus autem odio consectetur, maiores molestiae! Fugit, suscipit.</p> <p><a class="btn btn-secondary" routerlink="it-software" role="button">View details »</a></p> </div><!--/span--> <div class="col-xs-6 col-lg-4"> <h2>Office Productivity</h2> <p>Lorem ipsum dolor sit amet consectetur, adipisicing elit. Ut est suscipit provident ipsa beatae fugiat eveniet libero explicabo in illo quam omnis necessitatibus autem odio consectetur, maiores molestiae! Fugit, suscipit.</p> <p><a class="btn btn-secondary" href="#" role="button">View details »</a></p> </div><!--/span--> <div class="col-xs-6 col-lg-4"> <h2>Photography</h2> <p>Lorem ipsum dolor sit amet consectetur, adipisicing elit. Ut est suscipit provident ipsa beatae fugiat eveniet libero explicabo in illo quam omnis necessitatibus autem odio consectetur, maiores molestiae! Fugit, suscipit.</p> <p><a class="btn btn-secondary" href="#" role="button">View details »</a></p> </div><!--/span--> <div class="col-xs-6 col-lg-4"> <h2>Health and Fitness</h2> <p>Lorem ipsum dolor sit amet consectetur, adipisicing elit. Ut est suscipit provident ipsa beatae fugiat eveniet libero explicabo in illo quam omnis necessitatibus autem odio consectetur, maiores molestiae! Fugit, suscipit.</p> <p><a class="btn btn-secondary" href="#" role="button">View details »</a></p> </div><!--/span--> <div class="col-xs-6 col-lg-4"> <h2>Music</h2> <p>Lorem ipsum dolor sit amet consectetur, adipisicing elit. Ut est suscipit provident ipsa beatae fugiat eveniet libero explicabo in illo quam omnis necessitatibus autem odio consectetur, maiores molestiae! Fugit, suscipit.</p> <p><a class="btn btn-secondary" href="#" role="button">View details »</a></p> </div><!--/span--> </div><!--/row--> |
This code will enable the developers to display the ProgramsCategoryComponent in the main body of the Programs page. But if one wants the side menu to adapt to the content, the developer will have to follow the next step.
2.13 Making the Side Menu Adjust to the Current URL
As seen in the previous point, the current navigation scenario is such that when the user gets to the Programs page through the top menu, the action initializes the side menu, and it stays in that manner. And if the developer wants to have the side menu of the page react to the full URL path of the current program section, a modification is required in the routing config as shown here:
{ path: 'programs', component: ProgramsComponent, children: [ { path: '', component: ProgramCardsComponent }, // ++ THIS PART WAS ADDED { path: ':id', component: ProgramsCategoryComponent }, // -- THIS PART WAS ADDED { path: '', outlet: 'sidemenu', component: SideMenuComponent }, { path: ':id', outlet: 'sidemenu', component: SideMenuComponent } ] } |
As seen in this code, the configuration of navigation is done at the level of the side menu. So now, if the users want to navigate to the programs and from there to the development section, the developers must have SideMenuComponent to receive the segment of the new development through the subscription to the parameters that are observable.
2.14 How to Implement a Side Menu Navigation?
When the developers want to trigger navigation in the side menu, it can be directly in the template as well. If the scenario of navigation is more advanced, the developers can inject the router for convenience and can use its navigation API to create the navigation. This can be done through a template but it can be great if TypeScript auto-completion could be leveraged to fill in the required navigation parameters.
Basically, in these modern and advanced navigation scenarios, auto-completion is a concept that really helps by acting as a form of documentation that is always upgraded and updated. To do this type of navigation, first, we will have to change the HTML template of the program section card, and to do so, you can follow the below-given code:
<div class="col-xs-6 col-lg-4"> <h2>Software Development</h2> <p>...</p> <p><a class="btn btn-secondary" (click)="navigate('software-development')" role="button">View details »</a></p> </div> |
In this code, a click handler has been added in place of the routerLink directive which eliminates the need to configure the navigation in the template. To learn how to programmatically navigate the router link, let’s have a look at the next step.
2.15 Programmatic Navigation of Multiple Router Outlets
Here is the code for the programmatic navigation of various router outlets and this can also be carried out via the template:
@Component({ selector: 'app-program-cards', templateUrl: './program-cards.component.html', styleUrls: ['./program-cards.component.css'] }) export class ProgramCardsComponent { constructor(private router: Router, private route: ActivatedRoute) { } navigate(path) { this.router.navigate([{outlets: {primary: path, sidemenu:path}}], {relativeTo: this.route}); } } |
Here we can see the use of router navigation and router API in order to navigate in two outlets (the primary outlet and the sidemenu outlet) is done at the same time. Each of these outlets has the following things happening-
- In the primary outlet when the user is clicking on the programs section to visit the development category, it will trigger the ProgramsCategoryComponent display on the main Programs page.
- The navigation in this scenario is relative to the route that is present there as the developer is using the relativeTo property here and they pass this property in the active route that is currently present.
- Besides this, in the auxiliary sidemenu, when the user clicks the URL of the programs to visit the development section, it will trigger the SideMenuComponent and it will be updated as per the URL.
Here, in the SideMenuComponent, the developers have subscribed to the observable named route.params of the active route. This means that when the user clicks on the program category of the development section, the development will be printed on the browser through console.log.
3. Conclusion
In this blog, we understood the exact meaning of Angular routing and learned the basics used in handling it. We also went through how to handle routing in Angular and build an Angular Navigation menu in the application. All the source code described here helps developers to implement a navigation menu using Angular routing methods to enable the application to become user-friendly. And the reference of the code is also available on tech sites like GitHub for developers’ in-depth knowledge.


Comments
Leave a message...