Related Blogs

In the last blog of this SharePoint Framework series, our SharePoint Development team talked about the Field Customizer extension. This blog is the last one in this series in which we are going to create, debug, and deploy the ListView Command Set extension. SharePoint provides many of the OOTB commands available in the lists and libraries. But there can be some business requirements that require the custom commands to be developed. The ListView Command Set extensions help meet the requirement for provisioning the custom commands for lists or libraries.
The ListView Command Sets can be installed at both site level and tenant-level allowing users to select the availability of the commands to specific sites or all the sites of a tenant.
If you are a SharePoint developer and want to deploy a custom ListView Command Set extension., let’s dive into it in more detail.
1. Create a ListView Command Set Extension
- Create and move to a project directory as we did in Field Customizer.
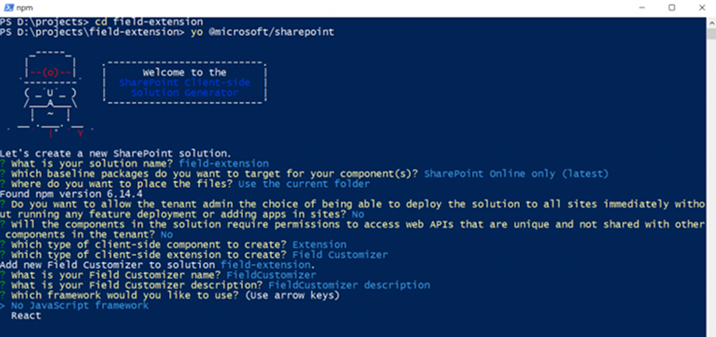
- Once moved into the project directory, run the yeoman command for creating a new SPFx solution.
- yo @microsoft/sharepoint
- Provide the project information as below when prompt.
- Solution Name – This will be the name of the solution of the extension.
- Baseline Target – Select SharePoint Online only (latest).
- Place for files – Select the current folder.
- Press Enter after selecting No (N) for the tenant admin to install an extension on each site. Selecting No will remove the ‘SkipDeploymentFeature’ from the “package-solution.json” file, which means SharePoint will not prompt to deploy the app to the tenant when the app is deployed. If a SharePoint developer is willing to install the extension at the tenant level, then it has to be selected as Yes (Y).
- Type of client-side component – Select Extension.
- Type of client-side extension – Select ListView Command Set.
- Field Customizer name – This will be the name for the command extension.
- Field Customizer description – Provide the appropriate description for the Command Set extension.
- Once all the details have been provided, the needed dependencies will be installed by the yeoman. Wait till the yeoman scaffolding is finished. Once the scaffolding is completed, open the solution in Visual Studio Code using the below command.
- Code.
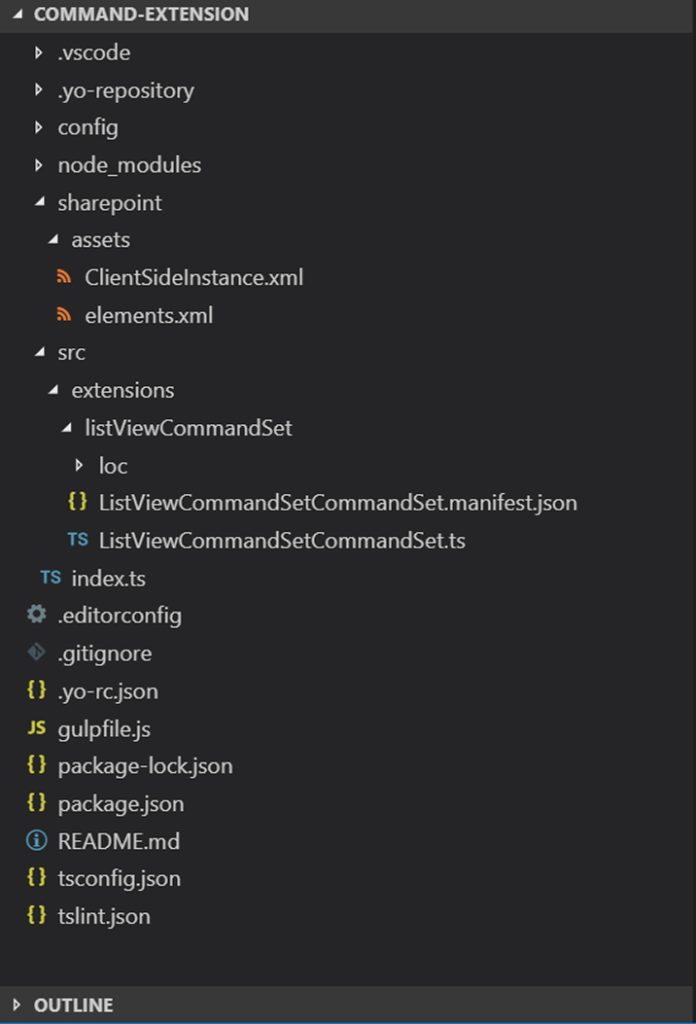
- Observe the solution structure. It is like the Field Customizer extension. There is one element.xml file, one .manifest.json file, and one .ts file for the custom code.
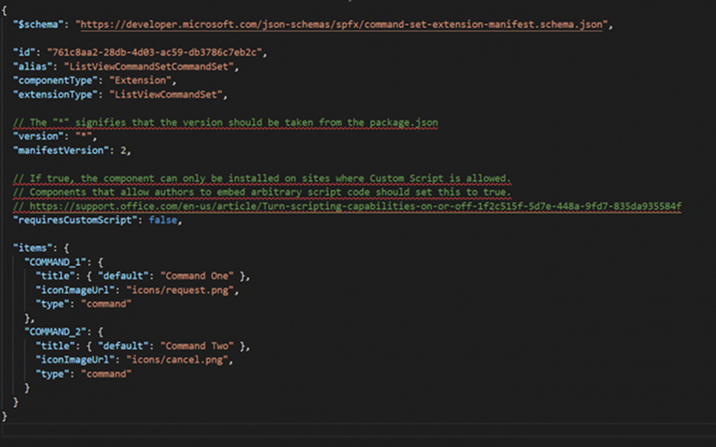
- Open and observe the ListViewCommandSetCommandSet.manifest.json file, which can be located at src ⇒ extensions ⇒ listViewCommandSet. The manifest file is similar as the Field Customizer, except it contains an additional node named “Items” with default two commands. These commands are the actual commands which are going to be displayed in the list.
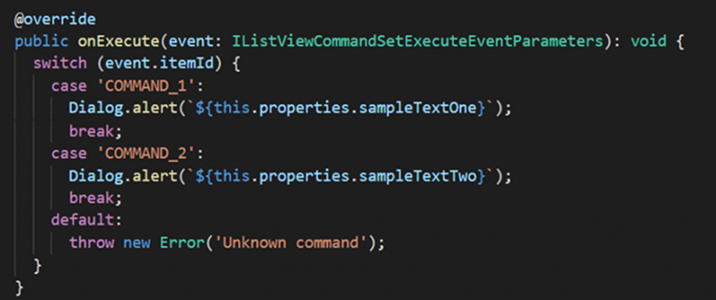
- The ListViewCommandSetCommandSet.ts file contains the code, and it is located at src ⇒ extensions ⇒ listViewCommandSet. Open the ListViewCommandSetCommandSet.ts file.
- From the sp-listview-extensibility base package, BaseListViewCommandSet class is imported.

- The code file of ListView Command Set contains three main methods.
- onInit()
- onListViewUpdated()
- onExecute()
- onInit(): This method comes on top of all the three methods. It is called to initialize the extension. A promise is returned to handle the asynchronous calls. The other methods are called once the promise is resolved. Any parameters that need to be initialized can be added here.

- onListViewUpdated(): This method is executed after onInit(). It handles the rendering of the command sets. If one needs to specify certain conditions to render the commands, that sort of logic can be written here. By default, it has the code for hiding the “Command One” until a list item is selected.

- onExecute(): This method is called as soon as the command is clicked. It handles the execution event of the command sets. When the solution is created, there will be a custom code to open a dialogue box on the click of commands.
2. Debug the Extension
In order to debug the extension, it is required to modify the serve.json file. Before moving forward, please refer to the debugging of an extension in our previous blog on Field Customizer.
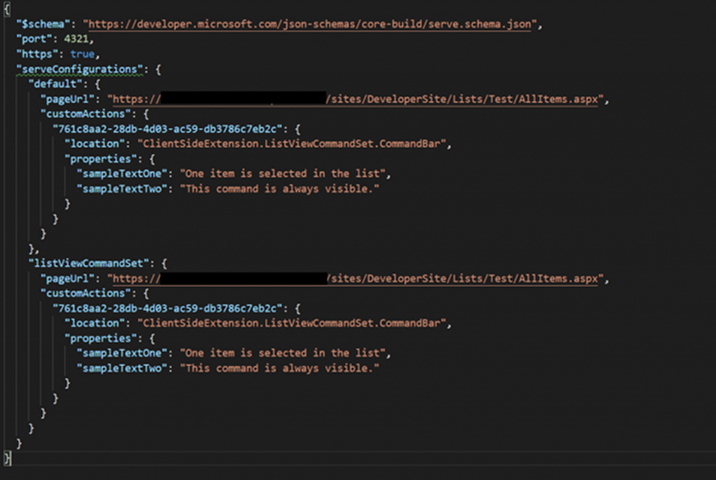
- In the serve.json file, refer to the “Default” node in serveConfigurations. It contains the below properties.
- pageUrl – In this field, provide the “AllItems.aspx” page URL of the target List.
- Eg. https://domain-name/sites/DeveloperSite/Lists/Test/AllItems.aspx
- location – >This field refers to the position of the Command Sets. We can choose the commands to reside in Command Bar, Context Menu, or in both. By default, the Command Bar will be specified. One can change it according to the requirement.
- Now, as per the above instruction, modify the serve.json file. The below image shows the updated file.
- Navigate to the list which is specified in serve.json for debugging. Insert some entries into it.
- It is necessary to install a developer certificate before starting the debug process. If it is already installed, then run the gulp-serve command in the console and allow the debug scripts in the browser. To know more about installing developer certificates and allowing the debug scripts, refer to debugging steps from our previous Field Customizer.
- Once the scripts are loaded successfully, it is noticed that one additional command named “Command Two” will be visible at the command bar.
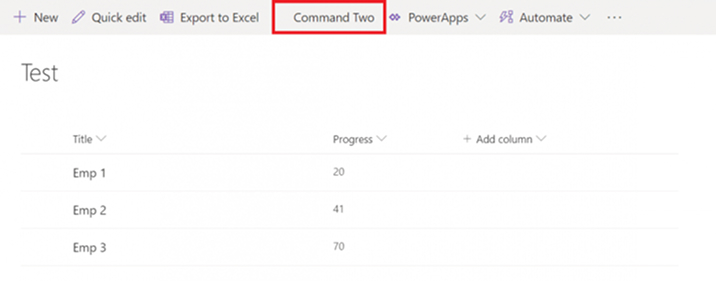
- Click on the command, and it will open a dialogue with the message “This command is always visible.” Click Ok to close it.

- Now, select any of the list items. Notice that “Command One” is also visible at the command bar. This is because of the default code in the ListViewCommandSetCommandSet.ts file, which renders this command conditionally when at least one item is selected in the list.
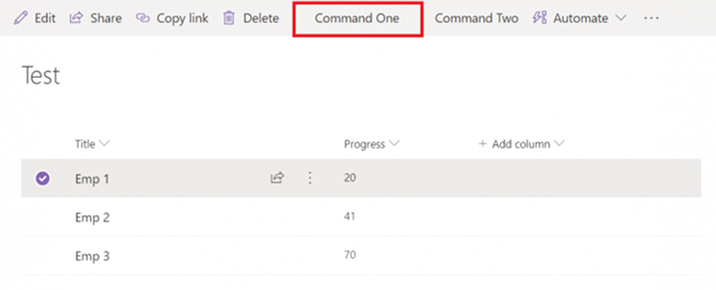
- Click on this command, and it will also open a dialogue box with the message “One item is selected in the list.”

- It is noticed that both the commands have some space at the beginning. That is because the CDN has not been provided for the icons. We will discuss the different approaches to set icons for the commands later in this blog.
- This was the basic example of ListView Command Set. Let’s modify the code to perform some additional tasks.
- Let’s create two commands to copy the student information from the Students list to two different lists, i.e., Section A and Section B.
- The end-user will make the entries into the Students list with information such as First Name, Last Name, and Section.
- The admin can copy this raw information to a classified list created for specific sections.
- Let’s modify the commands from the manifest.json file.

- The below image shows the code of onListViewUpdated() We have specified the condition to make the commands available only for the below conditions.
- When only a single item is selected from the list.
- When the name of the list is Students.
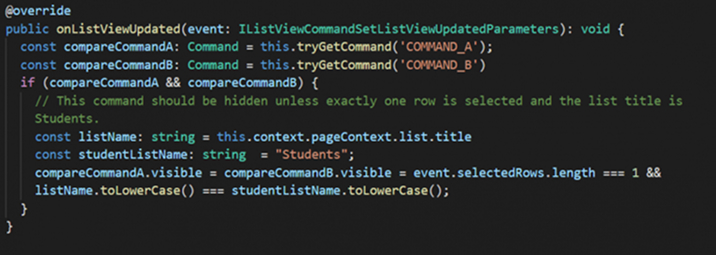
- On the execution of the command, we get the student information from the event.selectedRows, and those values are passed to a method that pushes the information to a specific list. Refer to the below images for this operation.
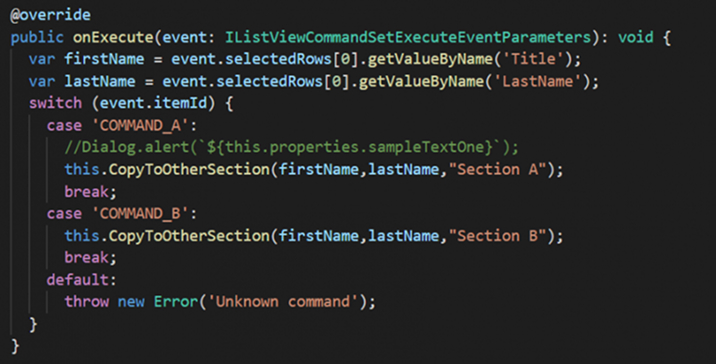

Note:We have used the sp-pnp-js for inserting the details into the lists. So, to make use of the above code, it is required to install the npm package for sp-pnp-js. For more information, refer to the below URL.
https://pnp.github.io/pnpjs/getting-started
- The Student list contains two entries. If any of the items is selected, both the commands specified in the manifest.json file will be visible on the command bar.

- Click on the Copy to Section A command. It will copy the student information to a list named “Section A.” Once the information is copied, it shows an alert dialog box with a success message.

- The values are reflected in the Section A list as we have concatenated the Student’s First Name and Last Name, so the list shows the complete student name.
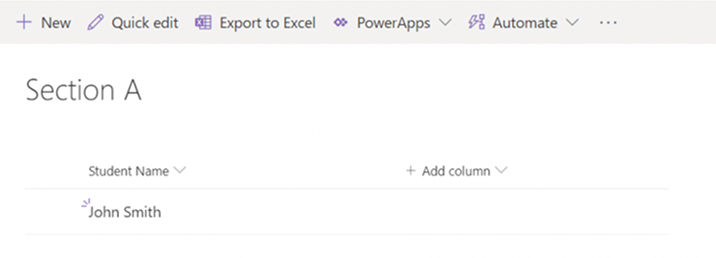
- The same output will be generated with the command Copy to Section B with student information copied to a list named “Section B.”
3. Icons for the Commands
- The ListView Command set is the only type of extension in SharePoint Framework so far, which provides custom icons. It allows users to select the custom icons for the commands so they can be distinguishable from the other OOTB commands.

- SPFX allows to define the icons in two ways, as mentioned below:
- External icon image
- Base-64 encoded image
- External icon image – In order to use an external icon image, one needs to specify the external URL of that image in the manifest.json file under the specified command’s IconImageUrl property. Refer to the below image in which the URL of images stored in the Site Assets library is provided.

- Base-64 encoded image – The use of a base-64 encoded image is similar to the external image URL. Instead of the external URL, just convert the image into base-64 code and paste that code in the IconImageURL property of the command. Refer to the below image in which the base-64 encoded image is provided.

There are multiple tools available online to convert the images to base-64 code.
Note: The command set uses base-64 code in a <img> tag. So, the format for the base-64 code must be as per the below.
“<MIMETYPE>;base64, <BASE64_ENCODED_IMAGE>”
e.g. data:image/png;base64, iVBORw0KGgoAAAANSUhEUgACAY…
4. Deploy the Extension
- The ListView Command Set extension can be deployed at the site collection level and tenant level. If it is deployed at the tenant level, then all the site collection in that tenant will have these command sets in lists or libraries based on the type specified in the element.xml file. Since we have configured the project solution not to be deployed at the tenant level, let’s deploy the Command Set extension to the site collection level.
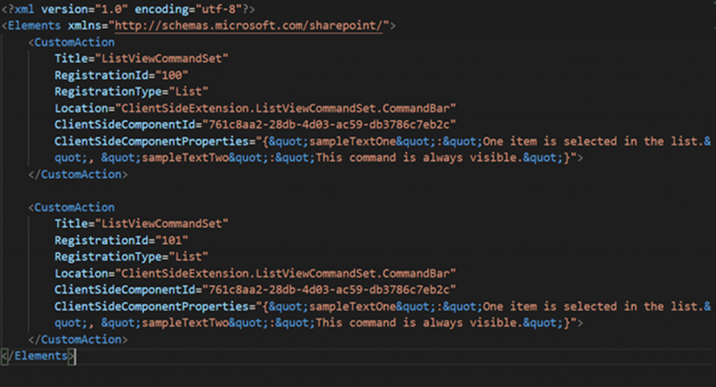
- Open the elements.xml file located at SharePoint ⇒ assets ⇒ elements.xml in the solution folder. The below image shows the default content of element.xml. It contains several fields.
- Title – It is the title of the command set.
- RegistrationId – It is used to specify the type of list. In the below image, it is 100, which stands for Custom List. Multiple Custom Actions can be added in order to show the command sets for multiple types of lists.
- RegistrationType – It specifies the type of app to which the command sets should be displayed. “List” is specified in the below image to show the command sets in Lists.
- Location – It is used to select where to display the command sets. By default, it is displayed at the command bar. Below are the values which can be used to specify the location of the command sets
- ListViewCommandSet.CommandBar – To register the command sets at the Toolbar of the list.
- ListViewCommandSet.ContextMenu – To register the command sets at the context menu of the list.
- ListViewCommandSet – To register the command sets at both the Toolbar and Context menu.

- The below image shows the updated element.xml file. Here, we have used two custom actions to make the commands available for custom lists and libraries.
- Now prepare a solution package (.sppkg) file and deploy it in the Apps library of App Catalog. Once the app is installed, add it to the site. Refer to the deployment steps in our previous Field Customizer blog of this series for detailed steps for preparing and deploying the (.sppkg) app.
- Once the app is added to the site, navigate to any of the existing lists, or create a new list. The command sets will be visible at the command bar without any debug query parameters.
5. Conclusion
The ListView Command Set extension helps to build custom commands with ease. It provides the level of customization from selecting the Icons to selecting the location for the commands. The custom icons help to have the commands a unique look and feel. SharePoint development companies can make the most out of this extension as per their requirements.

Shital Patel
Shital Patel is VP at TatvaSoft with a high-level of proficiency and technical precision in SharePoint Development. His experience of the last two decades has helped businesses to solve complex challenges resulting in growth and performance of Startups to Fortune 500 companies.
Subscribe to our Newsletter
Signup for our newsletter and join 2700+ global business executives and technology experts to receive handpicked industry insights and latest news
Build your Team
Want to Hire Skilled Developers?





Comments
Leave a message...