Related Blogs

Key Takeaways
- When developers from various teams contribute to a single monolith on the top of microservices architecture, it becomes difficult to maintain the large scale application.
- To manage the large-scale or complex application, breaking down the frontend into smaller and independently manageable parts is preferable.
- React is a fantastic library! One can create robust Micro-Frontends using React and tools like Vite.
- Micro Frontend with React provides benefits like higher scalability, rapid deployment, migration, upgradation, automation, etc.
It is a difficult and challenging task for developers to manage the entire codebase of the large scale application. Every development team strives to find methods to streamline their work and speed up the delivery of finished products. Fortunately, concepts like micro frontends and microservices are developed to manage the entire project efficiently and have been adopted by application development companies.
Micro frontends involve breaking down the frontend side of the large application into small manageable parts. The importance of this design cannot be overstated, as it has the potential to greatly enhance the efficiency and productivity of engineers engaged in frontend code.
Through this article, we will look at micro frontend architecture using React and discuss its advantages, disadvantages, and implementation steps.
1. What are Micro Frontends?
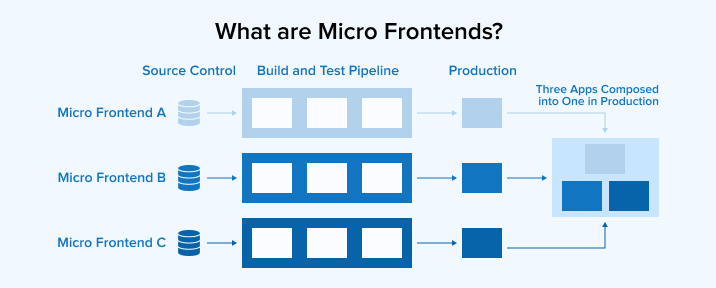
The term “micro frontend” refers to a methodology and an application development approach that ensures that the front end of the application is broken down into smaller, more manageable parts which are often developed, tested, and deployed separately from one another. This concept is similar to how the backend is broken down into smaller components in the process of microservices.
Read More on Microservices Best Practices
Each micro frontend consists of code for a subset (or “feature”) of the whole website. These components are managed by several groups, each of which focuses on a certain aspect of the business or a particular objective.
Being a widely used frontend technology, React is a good option for building a micro frontend architecture. Along with the React, we can use vite.js tool for the smooth development process of micro frontend apps.

1.1 Benefits of Micro Frontends
Here are the key benefits of the Micro Frontend architecture:
| Key Benefit | Description |
|---|---|
| Gradual Upgrades |
|
| Simple Codebases |
|
| Independent Deployment |
|
| Tech Agnostic |
|
| Autonomous Teams |
|
1.2 Limitations of Micro Frontends
Here are the key limitations of Micro Frontend architecture:
| Limitations | Description |
|---|---|
| Larger Download Sizes |
|
| Environmental Variations |
|
| Management Complexity |
|
| Compliance Issues |
|
Please find a Reddit thread below discussing the disadvantages of Micro frontend.
Comment
byu/crazyrebel123 from discussion
inreactjs
Now, let’s see how Micro Frontend architecture one can build with React and other relevant tools.
2. Micro Frontend Architecture Using React
Micro Frontends are taking the role of monolithic design, which has served as the standard in application development for years. The background of monolithic designs’ popularity is extensive. As a result, many prominent software developers and business figures are enthusiastic supporters. Yet as time goes on, new technologies and concepts emerge that are better than what everyone thinks to are used to.
The notion of a “micro frontend” in React is not unique; instead, it represents an evolution of previous architectural styles. The foundation of microservice architecture is being extensively influenced by revolutionary innovative trends in social media, cloud technology, and the Internet of Things in order to quickly infiltrate the industry.
Because of the switch to continuous deployment, the micro frontend with React provides additional benefits to enterprises, such as:
- High Scalability
- Rapid Deployment
- Effective migration and upgrading
- Technology-independence
- No issue with the insulation
- High levels of deployment and automation
- Reduced development time and cost
- Fewer Threats to safety and dependability have decreased
Let’s go through the steps of creating your first micro frontend architecture using React:
3. Building Micro Frontend with React and Vite
Let’s have a look at step by step process of how we can build microfrontend with React and Vite.
3.1 Set Up the Project Structure
To begin with, let’s make a folder hierarchy.
# Create folder named React-vite-federation-demo # Folder Hierarchy --/packages ----/application ----/shared |
# Create folder named React-vite-federation-demo # Folder Hierarchy --/packages ----/application ----/shared
The following instructions will put you on the fast track:
mkdir React-vite-federation-demo && cd ./React-vite-federation-demo mkdir packages && cd ./packages |
mkdir React-vite-federation-demo && cd ./React-vite-federation-demo mkdir packages && cd ./packages
The next thing to do is to use the Vite CLI to make two separate directories:
- application, a React app that will use the components,
- shared, which will make them available to other apps.
#./React-vite-federation-demo/packages pnpm create vite application --template React pnpm create vite shared --template React |
#./React-vite-federation-demo/packages pnpm create vite application --template React pnpm create vite shared --template React
3.2 Set Up pnpm Workspace
Now that you know you’ll be working with numerous projects in the package’s folder, you can set up your pnpm workspace accordingly.
A package file will be generated in the package’s root directory for this purpose:
touch package.json |
touch package.json
Write the following code to define various elements in the package.json file.
{ "name": "React-vite-federation-demo", "version": "1.1.0", "private": true, "workspaces": [ "packages/*" ], "scripts": { "build": "pnpm --parallel --filter \"./**\" build", "preview": "pnpm --parallel --filter \"./**\" preview", "stop": "kill-port --port 5000,5001" }, "devDependencies": { "kill-port": "^2.0.1", "@originjs/vite-plugin-federation": "^1.1.10" } } |
{ "name": "React-vite-federation-demo", "version": "1.1.0", "private": true, "workspaces": [ "packages/*" ], "scripts": { "build": "pnpm --parallel --filter \"./**\" build", "preview": "pnpm --parallel --filter \"./**\" preview", "stop": "kill-port --port 5000,5001" }, "devDependencies": { "kill-port": "^2.0.1", "@originjs/vite-plugin-federation": "^1.1.10" } }
This package.json file is where you specify shared packages and scripts for developing and executing your applications in parallel.
Then, make a file named “pnpm-workspace.yaml” to include the pnpm workspace configuration:
touch pnpm-workspace.yaml |
touch pnpm-workspace.yaml
Let’s indicate your packages with basic configurations:
# pnpm-workspace.yaml packages: - 'packages/*' |
# pnpm-workspace.yaml packages: - 'packages/*'
Packages for every application are now available for installation:
pnpm install |
pnpm install
3.3 Add Shared Component (Set Up “shared” Package)
To demonstrate, let’s create a basic button component and include it in our shared package.
cd ./packages/shared/src && mkdir ./components cd ./components && touch Button.jsx |
cd ./packages/shared/src && mkdir ./components cd ./components && touch Button.jsx
To identify button, add the following code in Button.jsx
import React from "React"; import "./Button.css" export default ({caption = "Shared Button"}) => <button className='shared-button'>{caption}</button>; |
import React from "React"; import "./Button.css" export default ({caption = "Shared Button"}) => <button className='shared-button'>{caption}</button>;
Let’s add CSS file for your button:
touch Button.css |
touch Button.css
Now, to add styles, write the following code in Button.css
.shared-button { background-color:#ADD8E6;; color: white; border: 1px solid white; padding: 16px 30px; font-size: 20px; text-align: center; } |
.shared-button { background-color:#ADD8E6;; color: white; border: 1px solid white; padding: 16px 30px; font-size: 20px; text-align: center; }
It’s time to prepare the button to use by vite-plugin-federation, so let’s do that now. This requires modifying vite.config.js file with the following settings:
import { defineConfig } from 'vite' import React from '@vitejs/plugin-React' import federation from '@originjs/vite-plugin-federation' import dns from 'dns' dns.setDefaultResultOrder('verbatim') export default defineConfig({ plugins: [ React(), federation({ name: 'shared', filename: 'shared.js', exposes: { './Button': './src/components/Button' }, shared: ['React'] }) ], preview: { host: 'localhost', port: 5000, strictPort: true, headers: { "Access-Control-Allow-Origin": "*" } }, build: { target: 'esnext', minify: false, cssCodeSplit: false } }) |
import { defineConfig } from 'vite' import React from '@vitejs/plugin-React' import federation from '@originjs/vite-plugin-federation' import dns from 'dns' dns.setDefaultResultOrder('verbatim') export default defineConfig({ plugins: [ React(), federation({ name: 'shared', filename: 'shared.js', exposes: { './Button': './src/components/Button' }, shared: ['React'] }) ], preview: { host: 'localhost', port: 5000, strictPort: true, headers: { "Access-Control-Allow-Origin": "*" } }, build: { target: 'esnext', minify: false, cssCodeSplit: false } })
Set up the plugins, preview, and build sections in this file.
3.4 Use Shared Component and Set Up “application” Package
The next step is to incorporate your reusable module into your application’s code. Simply use the shared package’s Button to accomplish this:
import "./App.css"; import { useState } from "React"; import Button from "shared/Button"; function Application() { const [count, setCount] = useState(0); return ( <div className="Application"> <h1>Application 1</h1> <div className="card"> <Button onClick={() => setCount((count) => count + 1)} /> </div> count is {count} </div> ); } export default Application; |
import "./App.css"; import { useState } from "React"; import Button from "shared/Button"; function Application() { const [count, setCount] = useState(0); return ( <div className="Application"> <h1>Application 1</h1> <div className="card"> <Button onClick={() => setCount((count) => count + 1)} /> </div> count is {count} </div> ); } export default Application;
The following must be done in the vite.config.js file:
import { defineConfig } from 'vite' import federation from '@originjs/vite-plugin-federation' import dns from 'dns' import React from '@vitejs/plugin-React' dns.setDefaultResultOrder('verbatim') export default defineConfig({ plugins: [ React(), federation({ name: 'application', remotes: { shared: 'http://localhost:5000/assets/shared.js', }, shared: ['React'] }) ], preview: { host: 'localhost', port: 5001, strictPort: true, }, build: { target: 'esnext', minify: false, cssCodeSplit: false } }) |
import { defineConfig } from 'vite' import federation from '@originjs/vite-plugin-federation' import dns from 'dns' import React from '@vitejs/plugin-React' dns.setDefaultResultOrder('verbatim') export default defineConfig({ plugins: [ React(), federation({ name: 'application', remotes: { shared: 'http://localhost:5000/assets/shared.js', }, shared: ['React'] }) ], preview: { host: 'localhost', port: 5001, strictPort: true, }, build: { target: 'esnext', minify: false, cssCodeSplit: false } })
In this step, you’ll also configure your plugin to use a community package. The lines match the standard packaging format exactly.
Application Launch
The following commands will help you construct and launch your applications:
pnpm build && pnpm preview |
pnpm build && pnpm preview
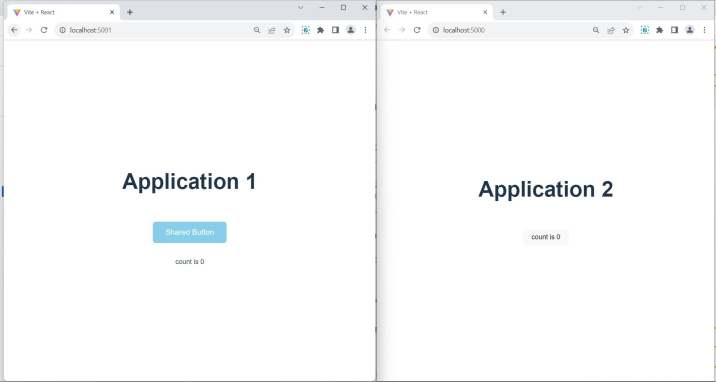
Our shared React application may be accessed at “localhost:5000”:

At “localhost:5001”, you will see your application with a button from the shared application on “localhost:5000”:
4. Conclusion
Micro Frontends are unquestionably cutting-edge design that addresses many issues with monolithic frontend architecture. With a micro frontend, you may benefit from a quick development cycle, increased productivity, periodic upgrades, straightforward codebases, autonomous delivery, autonomous teams, and more.
Given the high degree of expertise necessary to develop micro frontends with React, we advise working with professionals. Be sure to take into account the automation needs, administrative and regulatory complexities, quality, consistency, and other crucial considerations before choosing the micro frontend application design.

Vishal Shah
Vishal Shah has an extensive understanding of multiple application development frameworks and holds an upper hand with newer trends in order to strive and thrive in the dynamic market. He has nurtured his managerial growth in both technical and business aspects and gives his expertise through his blog posts.
Subscribe to our Newsletter
Signup for our newsletter and join 2700+ global business executives and technology experts to receive handpicked industry insights and latest news
Build your Team
Want to Hire Skilled Developers?


Comments
Leave a message...