Related Blogs
Microsoft is a tech avalanche company in the market with an aim to fulfill all business requirements. PowerApps is one of the prominent tools that has created a history in the world of business by offering everything within a single platform. Power Platform offers a quick development environment for creating bespoke apps for your organisation and also gives an opportunity to your project colleagues to become citizen developers. Businesses may easily create bespoke business apps with Power Apps that link to data stored in the underlying data platform or in different online and on-premises data sources like Excel, word, SharePoint, SQL server and similar.
We have been writing a trilogy on Microsoft PowerApps and till now, in the previous blog, we have discussed Power Platform, PowerApps and Canvas Apps. Often users are not clear with the difference between the two. So in this part of the series, our SharePoint Development Team will walk you through the second type of Power Apps – Model-driven apps. We will be discussing the most important yet debatable for users. The model driven apps and their differences with canvas driven apps. So, let’s get started.
1. What are Model-Driven Apps?
Model driven apps- It goes by name which means it is driven by data models. So obviously this app takes a data-first approach.The model-driven app is created using Power Apps, a framework for creating native Dynamics 365 apps. It applies a low-code or no-code approach in app development. This enables all the users from beginners to the one with experience in coding or with little or no coding expertise. Everyone can create model-driven software. Also, with the help of this application we can generate data models which will help us in sophisticated business applications.
Model-driven apps are recently added to Power Apps platform focusing on building apps with responsive UI, which runs in any browser and mobile devices with no code or low code approach required. The apps are useful as they provide access to a platform where we can design simple or complex apps. Model-driven power app accesses Common Data Service,(CDS). Common Data Service uses entities to store data similar to Dynamics 365.
When you create a model-driven app, you can link it to multiple entities. Before developing a model-driven app, you need to establish your data model. If you want to govern how data is managed, you must build business process Flows. You can add everything such as entities, dashboards, business process flows, Forms, views, and charts in a model-driven app. You may have built numerous views, charts, and flows for an object — in your model-driven app, you may select as needed.
2. Working of Model Driven Apps
The operations of Model driven apps are good at handling regular tasks, actions and other user data interactions.This enables no code approach so you don’t have to write a single code line or formula to develop an application. You can access these apps from any platform, web browser devices or even in outlook.
The primary functioning of Model-driven power applications are data-centric. This means using data they can perform consistent navigation, data interaction, and tools that allow users to deal with data regardless of the data object. The data structure determines which views and detail screens are displayed. There are users who can modify the user experience for that specific app by using those views and form designers while remaining within the constraints of views and forms.It decreases the time of development of a new application by guaranteeing a consistent user experience across data and other model-driven apps. This customer enhancement feature is also offered by Canvas apps, so how are they exactly different from each other?
We know that Canvas apps are the apps used to design and build highly customized apps without any deep expertise in coding .Canvas applications enable users to develop apps by simply dragging and dropping items into a canvas with complete control. You may also customize your applications to provide a user experience and interface that you like. With its rich functionality, You may experiment with the appearance and feel of your app by using the pre-built templates available in Canvas applications.
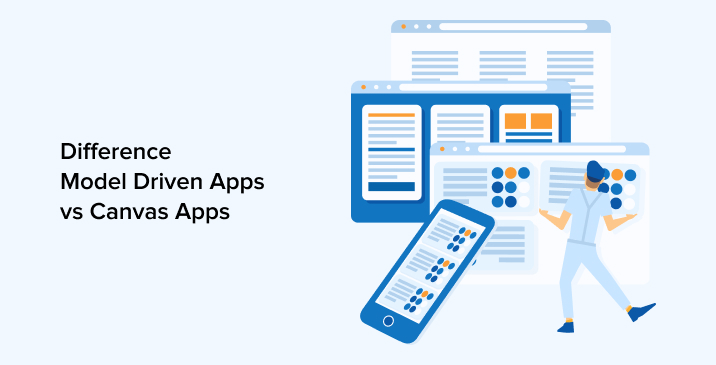
3. Difference Model Driven Apps vs Canvas Apps
| Parameter | Model Driven Apps | Canvas Apps |
|---|---|---|
| Bespoke Platform creation | Model Driven App is restricted to some aspects | Canvas App offers higher flexibility and extensibility |
| Integration | You can easily integrate with Microsoft family as well as other Model-driven Apps using Common Data Service (CDS) | Canvas App can be expanded upto 200+ connected data sources |
| Focus Area | Data, User experience and data model | User experience |
| Control | Controlled by the input provided in form of data | Provides almost all types of user control over single aspect |
| Ideal for | Works best at task based and user-based apps | Complicated business apps |
| Facilities | Low code or no code approach for app development | Drag and drop facility for creation of apps |
4. How to Create Model-Driven Apps?
If you are a SharePoint developer and wish to learn model-driven apps, let’s go through this app creation and its execution through the Customer Details Management demo.
4.1 Create Model-Driven Apps
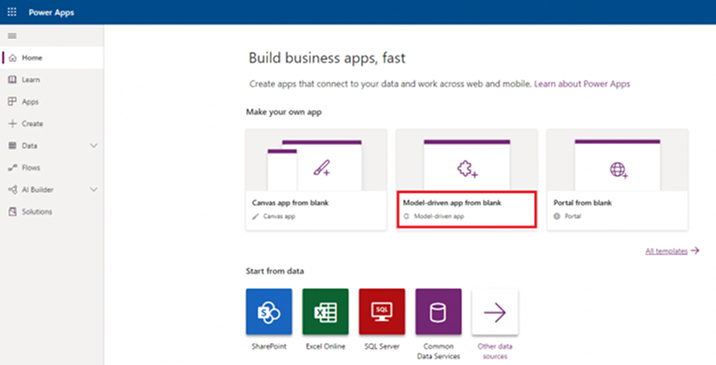
To create a model-driven apps, Power Apps Plan 2 is required. First login to Power Apps by navigating to link.
- Select the option ‘Model-driven app from blank’ amongst the three options available.

- Click on Create.
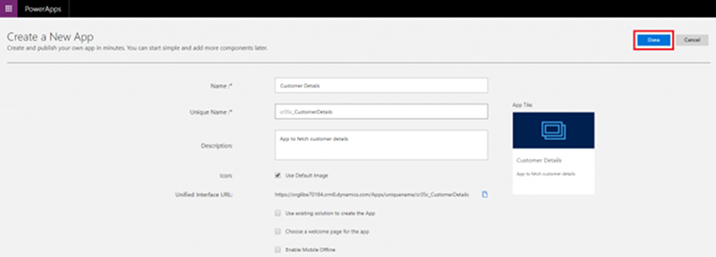
- Enter the App Name, its Unique Name, and Description, which is optional. Click on Done.

After the app is created, it will redirect to the App Designer screen.

Now, the app is created, and we can develop an app using the below three stages.
- Designing Business Data
- Defining business logic
- Composing the app
4.2 Designing Business Data
The data of model-driven is stored in Entities. Entities are like tables where columns are created with different data types as per the app’s requirement. SharePoint developers can follow the below steps for creating Entities:
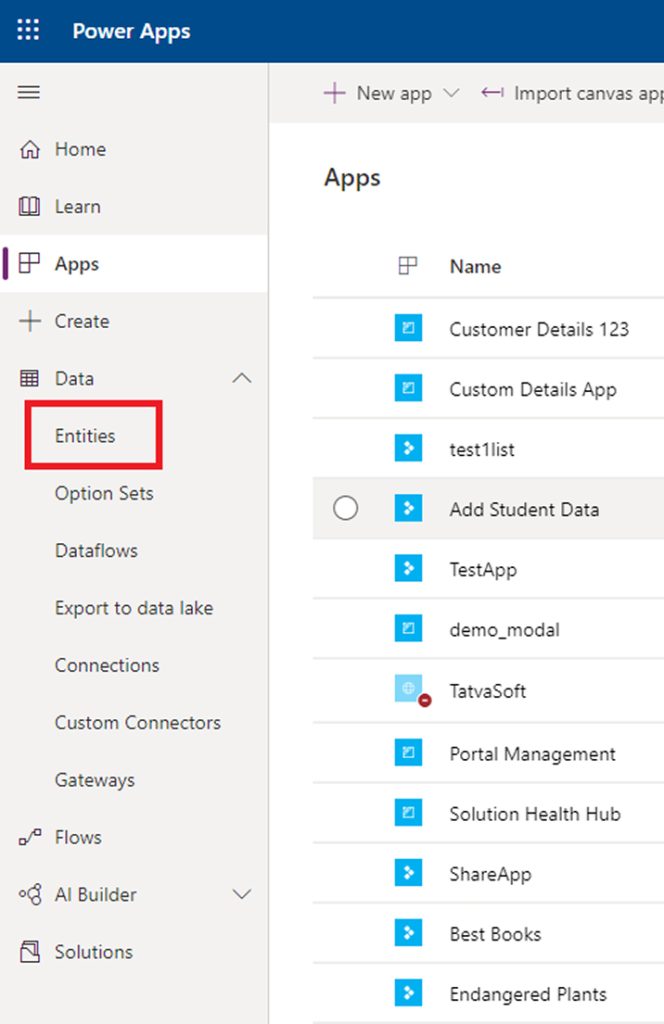
Select option Entities under Data in the left navigation pane.

- Default Entities list will be displayed.
To create a new Entity, click on the “New Entity” option on top of the page.

- Enter the Entity name, add the primary field of the Entity and click on the Create button.

The Entity will be created. Click on the Entity name to view its details. Consider here, Entity named “CustomerDetails” is created.

The page will display the default fields of the Entity. Click on the “Add field” option to create custom fields required by the app.

Enter the field name, select its data type, and click on the “Done” option at the bottom.

- Currently, we have created a few custom fields with different data types as below:
- Customer Name → Text
- Customer Number → Phone
- Order Items → Whole Number
- Place Order → Option Set
Inside the Place Order field, we have set the options as Yes and No.
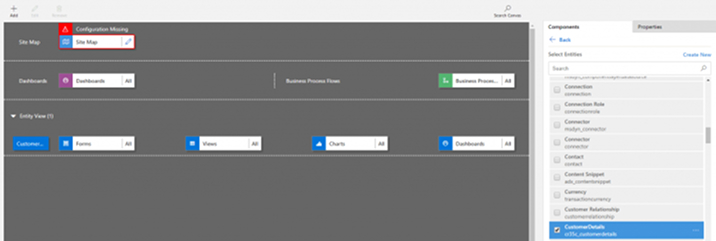
- Refresh the App Designer to reflect the changes made in the Entity. Add the newly created Entity to the App by clicking the “Entities” option in the App Designer pane.

Select the custom created Entity from the list of Entities, and it will be added under the Entities section.

- Similarly, multiple Entities, as required by the app, can be created and added to the App using the App Designer pane.
4.3 Defining Business Logic
After the required Entities are created and added to the app, the next step is to make the business logic using those Entities. To create business logic, follow the below steps:
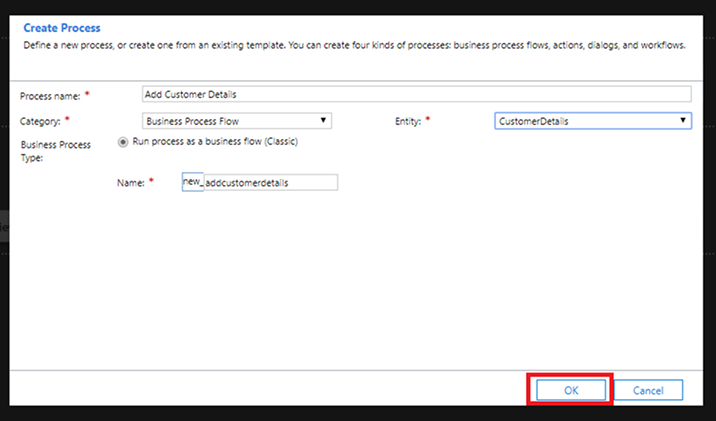
- In the App Designer pane, click on the Business Process option and select the Create New option.

Provide the name to the process, select the Entity on which the process is to be attached and then click OK.

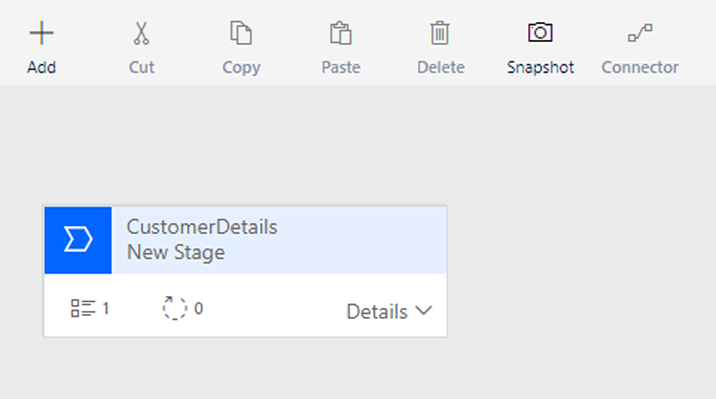
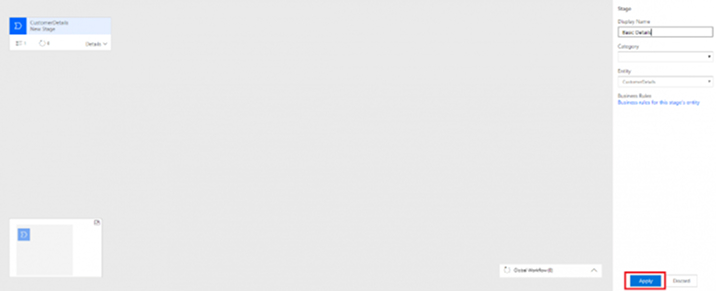
- A designer will open where a default stage is added.

Rename the stage by clicking on it and hit the “Apply” button.

A Data Step is included in the stage. Edit it by clicking on “Details” and then click on the Data Step.

A pane will open on the right-hand side, where the properties of the Data Step can be changed. Change the name of the Data Step, select the entity field, and click on Apply.

Note: SharePoint developers can check the Required attribute as per the requirement.
- Multiple Data Sets can be added to the Stage. Click on the Stage box and add another Data Step from the top.

- Click on the “+” symbol to add a new Data Step.
- Currently, the stage is defined to add Customer Name and Customer Number.

- New stage can be added by selecting the New Stage option under the “+ Add” symbol.

- Click on the “+” symbol, and a new stage will be added. In this example, the stage is asking the user to add the Number of Items to order.

- Now to add a condition, select the “Add Condition” option under the “+ Add” symbol. Set the condition details and click on Apply.

Here as per the current example, the condition is set to check if “Order Items” entered by the user is greater than 0. If it is greater than 0, allow the user to enter the “PlaceOrder” field value. Provided below is the full screenshot of the flow.
- From the designer’s top, click on Validate to check if there are any errors, and if there is no error, click on Save.

- Now after the business process flow is created, the next step is to Activate the flow. Click on the “Activate” option, and the flow will be attached to the App.
- Inside the App designer, select only one flow that is created.

4.4 Composing the App
After the entities are added, and business logic for the flow is decided, the last step is to compose the app, i.e., define the views, charts, and form structure.
- Click Forms to design the form structure for the App. There is a provision where a new form will be created.
- Click View to select the views for the Entity when the app is running. We can select multiple views, and a new View can also be created.
- Similarly, for Charts and Dashboard, new Charts and Dashboard can be created.
- One important thing to configure is the Site Map. Site Map defines the navigation in our App. Click on the Site Map option, and a pane will open to define Groups, Area and Subarea.

- Select the “Group” option under the “+ Add” symbol to add a Group.

- Group will be added to the pane. We can also drag and drop the Group, Area, and Subarea from the right panel.

- Add Subarea under Group and add the Entity to it.

- These Groups, Area, and Subarea will be displayed on the left pane when the App is running.
5. Run Model-Driven App
Once everything is defined and created for the app, the app is now ready to run.
Click on Publish and then on the Play option available in the top right corner of the App Designer.

- Now it’s time to add data to the Entity and check business flow.
- Click on the “+ New” icon to add data to Entity.

- Add Details under Basic Details by clicking on the Basic Details icon. Here, enter the Customer Number and Customer Number, and then hit on Save.

- After saving it, again clicking on the Basic Details tab will ask to move to Next Stage. Click on the Next Stage option.

- Enter Order Items and again click on Next Stage. Here as earlier defined in the business process flows, if order items entered are more significant than 0, then it will move to the next stage else not.
- If Order Items entered is greater than 0, it will ask for Place Order in the next stage and then click Finish.

- The completed message will be displayed once the flow is completed.

- Clicking on the Subarea added on the left page, here it is “CustomerDetails” will display the newly added Customer Details.

6. Conclusion
Through this blog, SharePoint developers can start to build powerful Model-driven apps. Based on the requirement, create ones’ ideas into simple/complex responsive accessible design running apps. Model Driven App composes the different kinds of components like forms, views, dashboards, charts, and various business processes with great UI. Don’t wait to try this powerful app, and stay tuned for our next topic – PowerApps Portals!!!
More Blogs on Power Apps:
Power Apps + Microsoft Bots = Power Bots
Power Apps – Canvas Apps (Part 1)

Shital Patel
Shital Patel is VP at TatvaSoft with a high-level of proficiency and technical precision in SharePoint Development. His experience of the last two decades has helped businesses to solve complex challenges resulting in growth and performance of Startups to Fortune 500 companies.
Related Service
SharePoint Development
Know more about SharePoint Development
Learn MoreAbout SharePoint DevelopmentSubscribe to our Newsletter
Signup for our newsletter and join 2700+ global business executives and technology experts to receive handpicked industry insights and latest news
Build your Team
Want to Hire Skilled Developers?








Comments
Leave a message...