Related Blogs

We all know Twilio is a CPaaS cloud platform as a service, renowned and extremely in use. We have learned the importance of Twilio in the software industry and learned about creating appointment bookings with Twilio API. In this blog, you will learn how to customize UI on the Twilio Flex with the help of CRM integration. If you are a software development company new to Twilio, we suggest you go through our first article Appointment Booking using Twilio.
1. What is Twilio Flex?
Twilio Flex is a popular programmable cloud communication platform that allows companies to completely take over business operations, from daily management to when and what to deploy.
Twilio Flex is used by React to customize your Flex instance and provide customized CRM solutions. The Flex plug-in allows customizing each component present in the instance to provide intuitive customized software solutions and help achieve goals by providing the best contact center platform.
2. How to Setup CRM with Flex
Mainly there are 3 steps to configure and update Flex instances in the Twilio Project. Now let us learn in detail how to set up CRM with Flex.
2.1 Flex Configuration
Before starting the development of Flex, it is equally necessary to configure the cloud platform center and configure the Flex in your project.
For configuration of Flex in your Project software developers can refer to the official documentation of the Twilio.
2.2 Flex Development and Customization
As of now, we have successfully installed and configured Flex within your Project. Now let’s start creating a React project for the development of the flex.
When you log in to Twilio using Twilio CLI, it will look like this-
> twilio login |
> twilio login
Once this screen appears to you, now the next step is Account SID and Auth Token which is located on the Twilio console dashboard.
After you have logged into the account with all necessary CLI commands using the same logged flex account.
Now the next command is to set up the flex plug-in on your local machine using the following command as shown below-
> twilio flex:plugins:create plugin-sample --install --typescript |
> twilio flex:plugins:create plugin-sample --install --typescript
After the plugin has been created, all Software developers need to do is migrate your code and initiate the flex.
> cd plugin-sample > twilio flex:plugins:start |
> cd plugin-sample > twilio flex:plugins:start
For more understanding, you should know that a Flex instance is now running on localhost:3000. To log in again on your Flex instance, click on the “Login with Twilio” link and log in with your Twilio credentials.
Prepare your Custom CRM component in the src/components directory that software developers want to replace with the default CRM in Flex.

Navigate into the plug-in created open the file src/samplePlug-in.tsx and configure that custom CRM component in the plug-in:
/** * This code is run when your plugin is being started * Use this to modify any UI components or attach to the actions framework * * @param flex { typeof Flex } * @param manager { Flex.Manager } */ init(flex: typeof Flex, manager: Flex.Manager) { this.registerReducers(manager); const options: Flex.ContentFragmentProps = { sort0rder: -1 }; flex. AgentDesktopVtew . Panell . Content . add(, options); // use CustomCRM that will use the task context to display the relevant Information flex.CRMContainer.Content.replace(); } |
/** * This code is run when your plugin is being started * Use this to modify any UI components or attach to the actions framework * * @param flex { typeof Flex } * @param manager { Flex.Manager } */ init(flex: typeof Flex, manager: Flex.Manager) { this.registerReducers(manager); const options: Flex.ContentFragmentProps = { sort0rder: -1 }; flex. AgentDesktopVtew . Panell . Content . add(, options); // use CustomCRM that will use the task context to display the relevant Information flex.CRMContainer.Content.replace(); }
In this way, we can add custom CRM options into the Flex instance quickly.
3. Flex Deployment
Once you are done with the customization of the CRM, the next step is going to be integrated into the Flex plug-in. Software developers will have to deploy the latest updated plug-in to the Twilio Flex.
The deployment process of the Flex is as follows
- In your project terminal, run the following command to deploy the latest changes.
>twilio flex:plugin:deploy --major --changelog "" --description ""
>twilio flex:plugin:deploy --major --changelog "" --description ""
- To enable the plug-in, run the following command.
>twilio felx:plugin:release --name "" --description "
>twilio felx:plugin:release --name "" --description "
- After all the above two steps, reload the latest CRM integrated with the Twilio Flex instance.
4. Step by Step Process to Create/Run a React Plug-in
In this article, we’ll develop a sample react Flex plug-in where we will display all the details of the caller by having a third-party API call and we will integrate that plug-in into a custom CRM.
Twilio Flex is sharing ongoing task details throughout the plug-in via the TaskContext feature.
For getting ongoing tasks within the CRM make sure software developers export the details from the Task context.
Here are some of the custom CRM briefs that we have developed in this application to show the details.
src/components/CustomCRM.tsx
import React from "react"; import { withTaskContext } from "@twilto/flex-ui"; class CustomCRM extends React.Component<any, any=""> { private fetchDetails = () => { // fetch the details and store the details /* * you will get the task in the props * Task Object * { source: any; source0bject: any; add0ns: object; age: number; attributes: any; dateCreated: Date; dateUpdated: Date; priority: number; queueName: string; queueSid: string; reason: string; sid: string; status: TaskReservationStatus; . . . . } */ } render() { return this.props.task ? ( {/* fetch the details of the caller and display here to make it visible on custom CRM */} } : { {/*You don’t have any on going call.*/} }; } } export default withTaskContext(CustomCRM); </any,> Src/samplePlug-in.tsx |
import React from "react"; import { withTaskContext } from "@twilto/flex-ui"; class CustomCRM extends React.Component<any, any=""> { private fetchDetails = () => { // fetch the details and store the details /* * you will get the task in the props * Task Object * { source: any; source0bject: any; add0ns: object; age: number; attributes: any; dateCreated: Date; dateUpdated: Date; priority: number; queueName: string; queueSid: string; reason: string; sid: string; status: TaskReservationStatus; . . . . } */ } render() { return this.props.task ? ( {/* fetch the details of the caller and display here to make it visible on custom CRM */} } : { {/*You don’t have any on going call.*/} }; } } export default withTaskContext(CustomCRM); </any,> Src/samplePlug-in.tsx
- Import the custom CRM in the plug-in as shown in the image
import CustomCRM from 'components/CustomCRM';
import CustomCRM from 'components/CustomCRM';
- Configure the CRM in init function as discussed in the above section
//use CutomCRM that will use the task context to display the relevant information
flex.CRMContaciner.Content.replace();
// use CustomCRM that will use the task
//use CutomCRM that will use the task context to display the relevant information flex.CRMContaciner.Content.replace(); // use CustomCRM that will use the task
When software developers start to deploy, the CRM configuration will take place as shown in the image below:
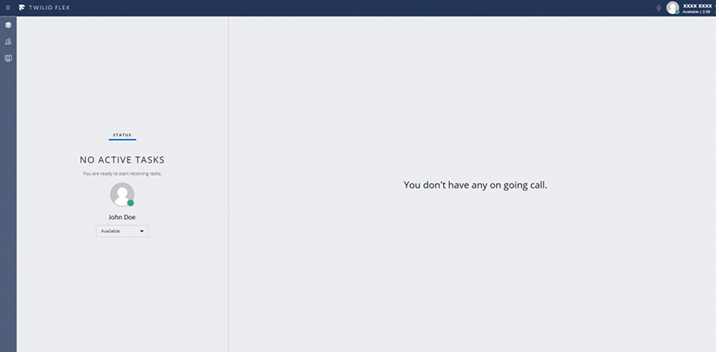
- When there is no ongoing call or task taking place.

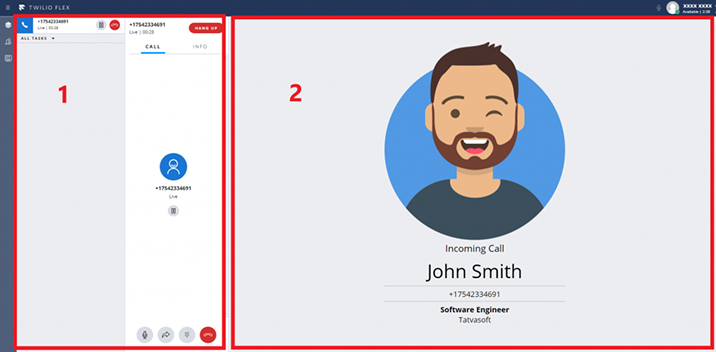
- And when there is an ongoing call happening on the app

This will also show the Active task details which will be displayed here. Agents can perform call operations like transfer, hold, disconnect, conference here in the module.
It is a CRM portion. Customized CRM details will be displayed here.
5. Conclusion
Twilio Flex is gaining great popularity but no one knows about this in-depth. So, we decided to create an extensive blog on how to use Twilio Flex. We hope you would have enjoyed reading this article as this is just a basic example of how Twilio can be configured and used. By using the ability to provide customized UI, you can provide facilities like call transfer, outbound calling with a nicer interface. A lot of handy things can be displayed on the same page using these React plug-ins.
Read More about Part 1 of this post Appointment booking using Twilio: A Complete Guide

Vishal Shah
Vishal Shah has an extensive understanding of multiple application development frameworks and holds an upper hand with newer trends in order to strive and thrive in the dynamic market. He has nurtured his managerial growth in both technical and business aspects and gives his expertise through his blog posts.
Related Service
Custom Software Development
Know more about our Custom Software Development Service
Learn MoreSubscribe to our Newsletter
Signup for our newsletter and join 2700+ global business executives and technology experts to receive handpicked industry insights and latest news
Build your Team
Want to Hire Skilled Developers?


Comments
Leave a message...